Modifying the RelationshipType Item
When a relationship is created from the source item, one of the items created automatically is the RelationshipType Item. RelationshipTypes can be found in the TOC, under the Administration folder. However, you should not create a RelationshipType on its own (with one rare exception, see Creating a Stand Alone RelationshipType), but only through the relationship creation from the source ItemType.
In our example, when we created a relationship from the source ItemType HousePlanner to the related ItemType Contractor, we called it ContractorRel. So, let's examine ContractorRel.
To edit the properties of the RelationshipType Item:
From TOC - -> Administration, select RelationshipTypes. Search for the ContractorRel item and open it for edit.
Let's explore the header properties first. Remember this item controls the behavior of the relationship itself.
|
Property Name |
Description |
|
Name |
The name of the relationship, given when defining the relationship in the source ItemType |
|
Label |
The label of the tab in the source item instance. Under this tab all the related item instances (Contractors in this case) will be displayed in the relationship grid. |
|
Description |
The description of the relationship. |
|
Auto Search |
When selected will automatically populate the relationship grid with the related item instances. Remember that the relationship grid is located under this relationship tab in the source item instance. |
|
Sort Order |
Determines the relative position of the tab in Source Item display |
|
Default Page Size |
Sets the page size in the relationship grid, under this relationship tab in the source item |
|
Source ItemType |
A unique name of an ItemType which acts as ‘parent’ in the relationship. Only one Source can be declared for every RelationshipType, and it is set automatically when the relationship is created |
|
Hide In All |
This option applies only if the Source Item is not selected. In that case, this relationship uses all ItemTypes as a source item, and creates a relationship between all ItemTypes and the related ItemType. In that case, the user has a choice to hide the relationship tab in all items, which is exactly what this option does if checked. |
|
Related ItemType |
Tthe related Item . This is automatically filled in when the relationship is defined in the source ItemType.
|
|
Min Occurs |
Sets the minimum number of rows for the relationship grid. . The grid above has 5 items. If the minimum was set to 6, you would receive an error when saving the Item shown above. |
|
Max Occurs |
Sets the maximum number of row entry instances for the relationship grid. See the item shown in Min Occurs. It has 5 rows. If the maximum was set to 4, you would receive an error when saving that item. |
|
Behavior |
Applies only if the related item is versionable, and determines which version of the related item is bound to the source item as follows:
|
|
Grid View |
The relationship grid displays the two types of properties - the related item properties, and the properties of the relationship itself. The possible values of Grid View are:
Grid View also works together with the Order By property on the ItemType to determine the properties precedence for ordering of the rows. In the case of relationships, we have the properties of the related item that may have an Order By value set, as well as the properties of the relationship ItemType itself that may have a set Order By value.
Consider the following examples. Say we have a source Part which has a BOM relationship with other Parts. Part ItemType has been defined such that Order By for Name = 10, and Order By for Part Number = 20. On the BOM Relationship itself, there are several properties, one of which is Quantity, where the Order By = 15. Below is a view of the BOM tab of the parent part when Grid View is set to Left. Notice that the Related Item property columns appear on the Left, where as the Relationship property columns follow. Also, notice that the list is sorted first by name of the related part, then by part number.
Below is a view of the BOM tab of the parent part when Grid View is set to Right. Notice that the Related Item property columns appear on the Right, after the Relationship property columns. Also, notice that the list of parts is sorted on the Quantity, which is the relationship's ItemType property whose Order By setting has precedence.
Below is a view of the BOM tab of the source or parent part when Grid View is set to Intermix. Notice that the columns are laid out in the absolute order as indicated by the Sort Order for each property. The order of the rows is also controlled by the absolute sorting sequence of the Order By attribute. The rows are sorted first on Part Name which has an Order By value of 10, then Quantity, which has an Order By value of 15, and finally by Part Number, which has an Order By value of 20.
|
|
Pick Only |
When creating a new related entry in the relationship grid, you could only pick from the existing Related Item instances. |
|
Create Only |
When creating a new related entry in the relationship grid, you could only create new instances of the Related Item. |
|
Pick & Create |
When creating a new related entry in the relationship grid, you could either pick from the existing Related Item instances, or create new ones to populate the relationship. |
|
Requires Related |
When checked, the No Related option is excluded from the drop down box of the source instance. So, when creating a new relationship entry for the source instance, you have only two choices: Pick Related or Create Related. Either way the related item must be entered.
|
|
Open Related Form |
If true, when creating a new related entry in the relationship grid, and creating a new instance of the Related Item, the form of the Related Item will be opened automatically for edit. If false, you can just enter the data into the property columns, or open the form manually from the popup menu option. |
|
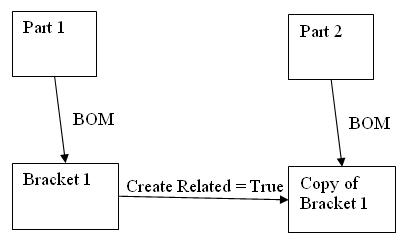
Copy Permissions |
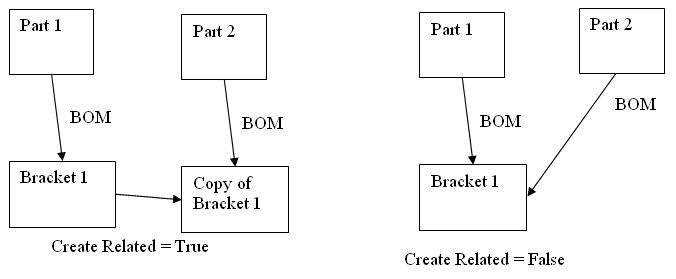
This option is relevant only if Create Related is True (see below). This case deals with the following occurrence: There is an instance of Part, called Part1 and in its BOM there is an instance of Bracket, called Bracket1. The user copies and pastes Bracket1 to another instance of Part, Part2. On the BOM RelationshipType the Create Related option is set to True; therefore Bracket1 is copied to a new instance of Bracket, Copy of Bracket1.
If the original instance Bracket1 had private permissions, the user has an option to copy those specific permissions by setting this flag to true:
|
|
Create Related |
This option is relevant only when copying and pasting relationships. Let's use the example of a Part assembly in whose BOM there is a part called Bracket. If you copy Bracket and paste it into the BOM of another parent Part, the following options are available:
|
Once the properties are entered, the next step is to enter information into the tabs:
Grid Events - If you wish to run client side methods, triggered on grid events such as: OnSelectRow, OnInsertRow, and OnDeleteRow, you would put your methods here. You might want to consider these methods if say you wish to populate some data into a relationship automatically when it is first created (OnInsertRow). For a great explanation on how to write client side method and how to set the other properties of this tab, such as RunAs User, please refer to the Aras Advanced Programming Training.
Relationship View - Sometimes you may not wish to see the basic relationship grid when you click the relationship tab in the source or parent instance. You may perhaps wish to see a web page, or a configurable grid . This tab is the place where you would specify these settings. Also, these settings are identity based, so different users could be directed to different pages or grids. Here is an example of using a configurable grid instead of the basic relationship grid:
Let's examine the properties or columns of this tab:
Name - the name of the identity for which this view is valid
Start Page - the http:// path to the web page to be displayed
Parameters - the inputs (if any) that you wish to pass to the web page
Grid - the reference (chosen from a selection dialog) to a configurable grid designed for this view
Exclusion - Sometimes relationships may be mutually exclusive. For example, you may have a relationship such as a BOM for a part, and a relationship such as Vendors for a part. However, the part is either made in house, in which case you would need a BOM tab, or it is bought from a vendor, in which case you only need a Vendors tab. So, on the Exclusion tab you can specify a list of relationships that are mutually exclusive. In this example, in the RelationshipType for BOMRel, you would specify VendorsRel under the Exclusion Tab.
Hide In - When selected, this option will hide the relationship tab in all Source item instances. For example, if we edit the BOM relationship, and select Hide In Tab View, the BOM tab will be hidden in all instances.