Creating an ItemType
Every Item in Innovator is an instance of an ItemType. Creating an ItemType consists of filling out its header properties and its tabbed properties. Some of the properties may result in complex structures or concepts. For those properties you will find links to the discussion of the underlying concepts.
To create an ItemType:
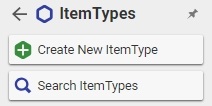
1. From the Navigation pane, select Administration>ItemTypes. The following menu appears:
2. Click Create New ItemType. A blank ItemType window appears:
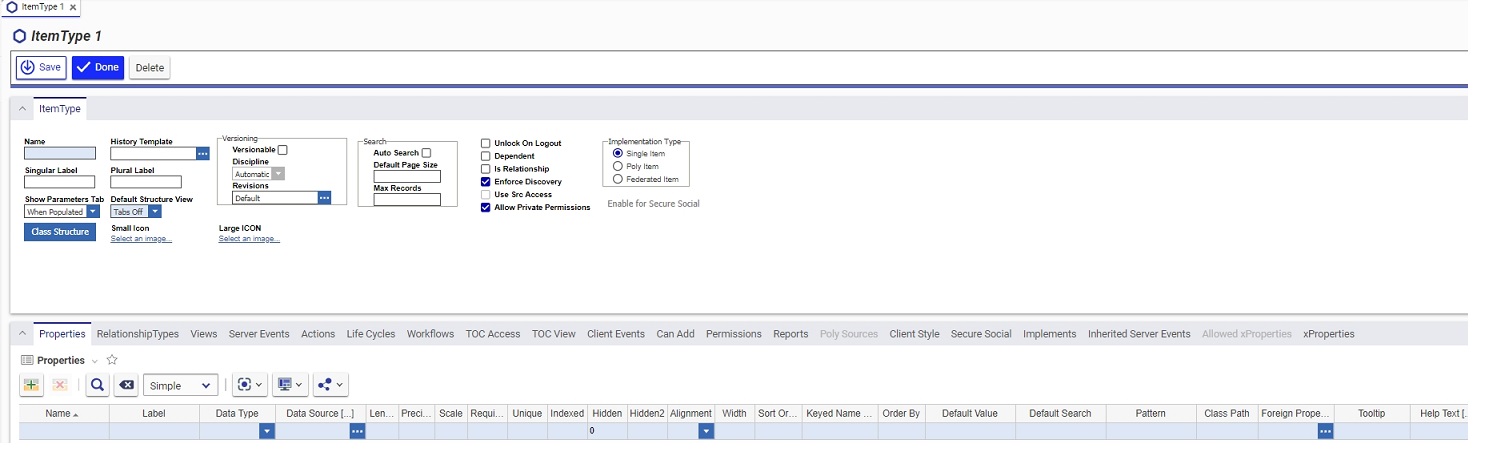
Let's look at the header properties first. Here is a list of the header properties and their explanations:
Name - the name of the ItemType
Singular Label - the label of the ItemType that appears in an Item window. It serves as a general reference to a single instance of the ItemType.
Plural Label - the label of the ItemType that appears in the TOC and serves as a general reference to multiple instances of the ItemType.
Class Structure - click if you wish to design a class structure for this item. The Class Structure dialog appears. Right-click on any item in the structure to access the pop-up menu:
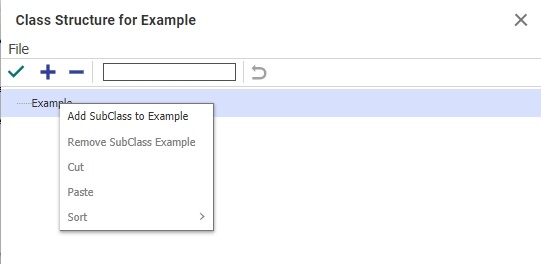
Right-clicking on any item in the structure, brings up this pop-up menu. You can create subclasses as many levels deep as required. Then, back on the ItemType form, you can create class specific properties for each subclass, as well as designate different forms for each subclass. For more information on how these structures work, please refer to Class Structure.
Small Icon - Click on the link. The Image Browser dialog appears. Click the Images folder and select the icon of your choice. Click the Return Selected icon  to complete your selection. Notice that the link is replaced by the icon that you chose. The small icon will appear next to the ItemType label in the TOC.

Large Icon - Click on the link. The Image Browser dialog appears. Select the icon of your choice, and click the Return Selected icon  to complete your selection. Notice that the link is replaced by the icon that you chose. The large icon will appear on the ItemType form used to create instances of the ItemType.
Default Life Cycle- every item in Innovator may have an associated Life Cycle. To understand how to create Life Cycles, what they mean, and what options are available, please refer to Life Cycles.
3. If you have created a Life Cycle that you wish to assign to this ItemType, select the Life Cycle tab.
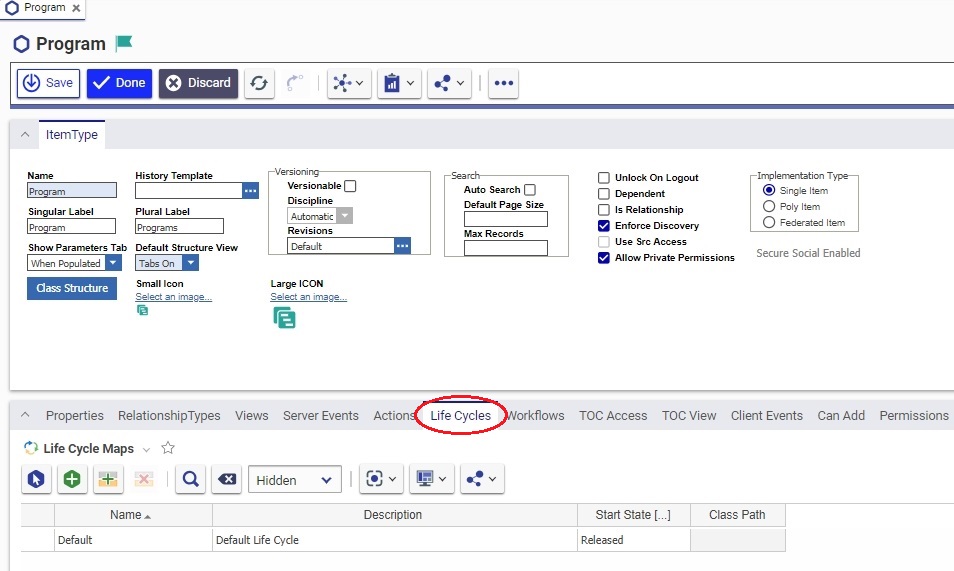
4. Click the Select Items icon  . The Life Cycle Map search dialog appears. Click the Run Search
  icon.
icon.
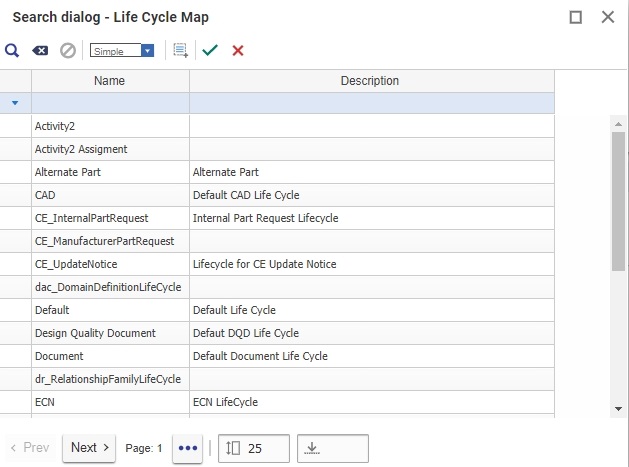
5. Select the Life Cycle you want to assign to this ItemType, then click the Return Selected icon  to complete the selection.
History Template - Defines what history will be saved for the ItemType. For more information, see Configurable History
Default Structure View - Defines whether the item form displays tabs or not. For each relationship described in the ItemType, a tab is displayed on the item form. For example, let's look at the ItemType definition for Parts:
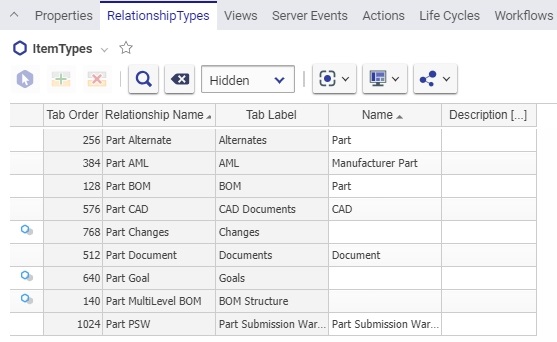
Notice that there are nine tabs defined, with the labels shown in the center column. If we were to create a new Part, the following form appears:
![]()
Notice that the described tabs appear on the New Part form.
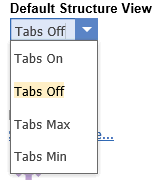
To have the tabs appear on the form, select Tabs On from the dropdown in the Default Structure View property in the ItemType definition. If you wish to hide the tabs, change the Default Structure View to Tabs Off.
The Default Structure View controls the tab setting for all instances of this ItemType; however, there is also a way to control the structure view on an individual basis for each form, simply by selecting the Hide Tabs icon directly on the form:
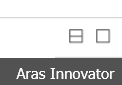
If the button is selected when the form appears, and you wish to see the tabs, simply click the icon. Similarly, if you do not wish to see the tabs and they appear on the form, simply select the icon again.
Versioning- controls the different possible settings of version control for the item instances created from the ItemType definition:
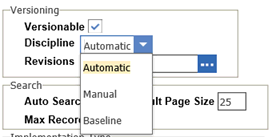
Versionable - when checked, this setting indicates that each time the item is edited a new generation of the item is created. All generations of the item are stored in the database, and can be referenced as necessary. Click the More button  and select Properties from the menu to view the item's Revision and Generation information:
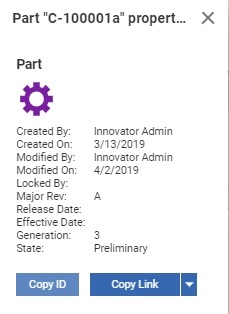
Notice that for each selected item in the list, the last group of three properties shows the Major Rev and the Generation.
Manual Versioning - when checked this setting indicates that the version increment will take place manually, when initiated by the user. Each version, however, will be saved in the database.
Revisions - an Item that lists the Revision sequence. The default is each letter of the alphabet in order. To create a different sequence for revisions, see Revisions.
Search - defines parameters which govern the appearance of the list page when the Item is selected in the main tree view, or TOC.
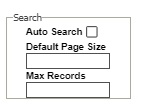
Auto Search - a boolean to indicate if the search should be invoked when the user clicks on the defined ItemType in the TOC. For example, if you go to TOC --> Administration --> Charts, you will see that the Charts list will automatically populate. In the Charts ItemType definition, the Auto Search option is set to true.
Default Page Size - if you selected to do Auto Search, you can specify the default page size, which means how many items will appear on a page. Typically this number is set to 25. If left blank, the page size equals the Max Records field.
Max Records - Specify the maximum number of records for the search. If there are numerous instances, limiting the search each time this page is opened, improves performance.
Implementation Type - specifies which type of item is being defined, Single Item or Poly Item. If Poly Item is specified, and the ItemType is saved, it cannot revert back to the Single Item.
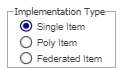
Single Item - the typical implementation where the ItemType represents a definition of a class of items. The Single Item is the Implementation Type assumed in this section.
Poly Item - the wrapper item which really points to any number of specified Single Items. For example, in Project Management there is a Poly Item called the Deliverable which can be any number of things, such as a Document, an ECN, a Part, a DFMEA, etc., the idea being that it is the item being delivered as a result of a scheduled activity. Please refer to Poly Items for more information.

Unlock on Logout - a Boolean to indicate if the item is to be unlocked when the user that locked it logs out.
Dependent - a Boolean to indicate that this item depends on another Item, and is meaningless without the parent item. For example, documentation for a particular part is meaningless if the part is deleted. So, if the item is PartDocumentation, it would probably be dependent on the Part.
Is Relationship - a Boolean to indicate if this ItemType is a relationship. See Relationships for further instructions on creating relationships.
Enforce Discovery - If checked, discovery access is enabled, otherwise discovery access is disabled, see Discovery Privilege
Use Src Access - applies to Relationship ItemTypes, when checked this means that the permissions to the related items will be the same as on the parent or source item.
Allow Private Permissions - a Boolean to indicate if the access to a single item instance can be changed by an identity in the current set of permissions. For example, if an identity (such as an auditor) needs to be added to the permissions set for a particular Project instance.
The next step is to enter the information for the different tabs in the ItemType. Below is a list of these tabs and links to the pages which describe each one.

Properties - to enter new properties for an ItemType, see Entering ItemType Properties.
Relationship Types - to define relationships for an ItemType, see About Relationships.
Views - to select the Forms used for the ItemType, Note that different Forms can be used for Viewing and Editing, and for different Classifications, in each case for different Identities
Server Events - this tab holds a list of server-side methods that could be triggered by a number of different events, such as lock and unlock. The discussion of these methods is beyond the scope of this manual. To write these methods, one must have a solid knowledge of programming as taught in the Aras Advanced Programming Training. The properties that can be set for each method, such as the RunAs User, are also fully explained and taught in this course.
Actions - Enable users to select custom behavior implemented in Methods, from the Main or Item Window Menus
Life Cycles - Enable different Life Cycle Maps to be selected for different Classifications.
Workflows - this tab lists all the workflows associated with this item, whether the workflow is started programmatically, or is a subflow of another workflow, or is the default workflow started automatically on instance creation, it must be listed here. To learn more about workflows, how they work and how to create them, please see Workflows.
TOC Access - the information under this tab describes where the new Item will appear on the TOC and which identities will be able to see it and access it. See TOC Access Permission for more information.
TOC View - the information under this tab may alter what the user sees when they select an Item from the TOC. These settings are identity based, so a different view may be created for different users.
Client Events - this tab holds a list of client-side methods that are triggered with three different events: OnBeforeNew, OnNew, and OnAfterNew. These events have to do with instance creation. So, for example, when a new instance is created, you might want to run a method to populate certain properties, prior to the user seeing the item form for the first time.
The other properties of this tab, such as the RunAs User and Password are explained fully in the Aras Advanced Programming Training. We strongly suggest that you take this class prior to writing methods or designing complex customizations.

xItemTypeAllowedProperty
Can Add - this tab contains a list of identities which can add the new instances of this item type. See Can Add for more informations.
Permissions - this tab contains the permissions for this item, i.e. which identity can see the items, edit them, and delete them. See Permissions for more details.
Reports -
Polysources - this tab is used for the creation of Poly Items, to specify the source ItemTypes which are combined to form this PolyItem. See Creating a Poly Item ItemType for more information.
Client Style - this tab is used to customize the UI.
Secure Social - this tab is used to specify to make the ItemType usable for secure social activities such as discussion boards and bookmarks.
Implements - this tab is used to add polymorphic ItemTypes.
Inherited Server Events - this tab is used to add inherited server events to the ItemType.
xProperties - This tab is used to add xProperties to the ItemType.